Introduction to kubernetes - Volume

DevRel at StackGen | Formerly at Deepfence ,Tenable , Accurics | AWS Community Builder also Docker Community Award Winner at Dockercon2020 | CyberSecurity Innovator of Year 2023 award by Bsides Bangalore | Docker/HashiCorp Meetup Organiser Bangalore & Co-Author of Learn Lightweight Kubernetes with k3s (2019) , Packt Publication & also run Non Profit CloudNativeFolks / CloudSecCorner Community To Empower Free Education reach out me twitterhttps://twitter.com/sangamtwts or just follow on GitHub -> https://github.com/sangam14 for Valuable Resources
stateful applications store their state on disk. That leaves us with a problem. If a container crashes, kubelet will restart it. The problem is that it will create a new container based on the same image. All data accumulated inside a container that crashed will be lost.
Kubernetes Volumes solve the need to preserve the state across container crashes. In essence, Volumes are references to files and directories made accessible to containers that form a Pod. The significant difference between different types of Kubernetes Volumes is in the way these files and directories are created.
While the primary use-case for Volumes is the preservation of state, there are quite a few others. For example, we might use Volumes to access Docker’s socket running on a host. Or we might use them to access configuration residing in a file on the host file system.
We can describe Volumes as a way to access a file system that might be running on the same host or somewhere else. No matter where that file system is, it is external to the containers that mount volumes. There can be many reasons why someone might mount a Volume, with state preservation being only one of them.
5 - Types of Kubernetes Volumes
Persistent Volumes
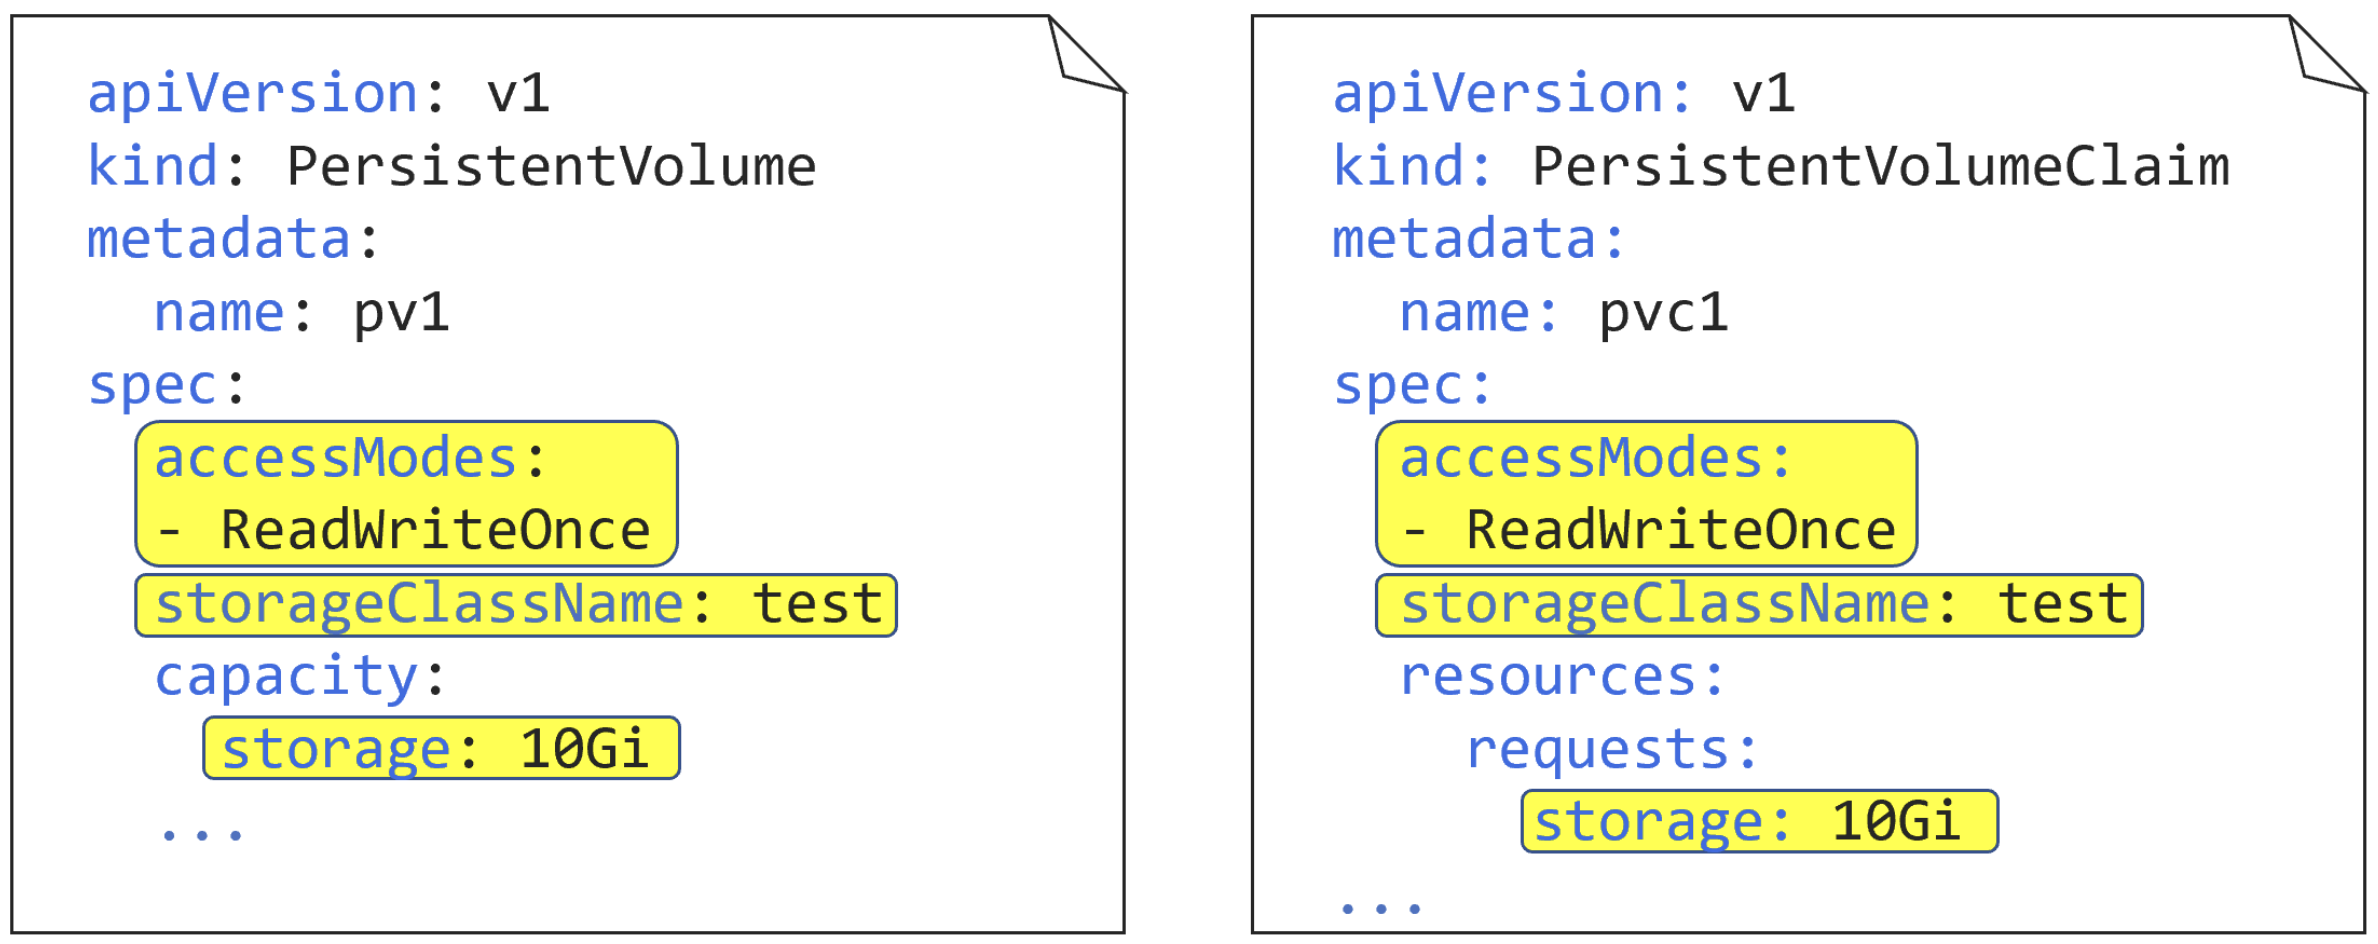
Kubernetes provides a PersistentVolume subsystem with an API that abstracts storage provisioning and consumption. It works with two API resources—PersistentVolume (PV) and PersistentVolumeClaim (PVC).
- PersistentVolume (PV)
apiVersion: v1
kind: PersistentVolume
metadata:
  name: pv1
spec:
  accessModes:
  - ReadWriteOnce
  storageClassName: test
  capacity:
    storage: 10Gi
  persistentVolumeReclaimPolicy: Retain
  gcePersistentDisk:
    pdName: uber-disk
PersistentVolume (PV) resources are defined in v1 of the core API group. You’re naming this PV “pv1”, setting its access mode to ReadWriteOnce, and making it part of a class of storage, called “test”. You’re defining it as a 10GB volume, setting a reclaim policy, and mapping it back to a pre-created GCE persistent disk called “uber-disk”.
The following command will create the PV. It assumes the YAML file is in your PATH and is called gke-pv.yml. The operation will fail if you have not pre-created “uber-disk” on the back-end storage system (in this example the back-end storage is provided by Google Compute Engine)
$ kubectl apply -f gke-pv.yml
    persistentvolume/pv1 created
Check that the PV exists.
$ kubectl get pv pv1
NAME   CAPACITY   MODES   RECLAIM POLICY   STATUS      STORAGECLASS ...
pv1    10Gi       RWO     Retain           Available   test
.spec.accessModes defines how the PV can be mounted. Three options exist:
ReadWriteOnce (RWO) ReadWriteMany (RWM) ReadOnlyMany (ROM)
ReadWriteOnce defines a PV that can only be mounted/bound as R/W by a single PVC. Attempts from multiple PVCs to bind (claim) it will fail.
ReadWriteMany defines a PV that can be bound as R/W by multiple PVCs. This mode is usually only supported by file and object storage, such as NFS. Block storage usually only supports RWO.
ReadOnlyMany defines a PV that can be bound by multiple PVCs as R/O.
A couple of things are worth noting. First, a PV can only be opened in one mode – it is not possible for a single PV to have a PVC bound to it in ROM mode and another PVC bound to it in RWM mode. Second, Pods do not act directly on PVs; they always act on the PVC object that is bound to the PV.
.spec.storageClassName tells Kubernetes to group this PV in a storage class called “test”.
A PV is a storage resource located in the cluster. Administrators can manually p. rovision PVs, and Kubernetes can use storage classes to dynamically provisioned PVs. Like volumes, PVs are plugins, but their lifecycle is independent of any pod using the PV.A PV works as an API object that captures the details of the storage implementation, including iSCSI, NFS, and cloud provider storage systems. It works similarly to a node but offers storage resources rather than computing.
- PersistentVolumeClaim (PVC)
apiVersion: v1
kind: PersistentVolumeClaim
metadata:
  name: pvc1
spec:
  accessModes:
  - ReadWriteOnce
  storageClassName: test
  resources:
    requests:
      storage: 10Gi
PV, a PVC is a stable v1 resource in the core API group
The most important thing to note about a PVC object is that the values in the .spec section must match with the PV you are binding it with. In this example, access modes, storage class, and capacity must match with the PV.
Note: It’s possible for a PV to have more capacity than a PVC. For example, a 10GB PVC can be bound to a 15GB PV (obviously this will waste 5GB of the PV). However, a 15GB PVC cannot be bound to a 10GB PV.
$ kubectl apply -f gke-pvc.yml
   persistentvolumeclaim/pvc1 created
Check that the PVC is created and bound to the PV.
$ kubectl get pvc pvc1
   NAME   STATUS   VOLUME   CAPACITY   ACCESS MODES   STORAGECLASS
   pvc1   Bound    pv1      10Gi       RWO            test
OK, you’ve got a PV, called pv1, representing 10GB of external storage on your Kubernetes cluster, and you’ve bound a PVC, called pvc1, to it. Let’s find out how a Pod can leverage that PVC and use the actual storage.
More often than not, you’ll deploy your applications via higher-level controllers like Deployments and StatefulSets, but, to keep the example simple, you’ll deploy a single Pod. Pods deployed like this are often referred to as “singletons” and are not recommended for production as they do not provide high availability and cannot self-heal.
The following YAML defines a single-container Pod with a volume, called “data”, that leverages the PVC and PV objects you already created. The file is called volpod.yml.
apiVersion: v1
kind: Pod
metadata:
  name: volpod
spec:
  volumes:
  - name: data
    persistentVolumeClaim:
      claimName: pvc1
  containers:
  - name: ubuntu-ctr
    image: ubuntu:latest
    command:
    - /bin/bash
    - "-c"
    - "sleep 60m"
    volumeMounts:
    - mountPath: /data
      name: data
storage is .spec.volumes. This defines a volume, called “data,” which leverages the previously created PVC, called “pvc1”.
You can run the kubectl get pv and kubectl get pvc commands to show that you’ve already created a PVC, called “pvc1,” that is bound to a PV, called “pv1”. kubectl describe pv pv1 will also prove that pv1 relates to a 10GB GCE persistent disk called “uber-disk”.
Deploy the Pod with the following command.
$ kubectl apply -f volpod.yml
You can run a kubectl describe pod volpod command to see that the Pod is successfully using the data volume and the pvc1 claim.
A PVC is a storage request made by a user. It works similarly to a pod but consumes PV resources rather than node resources. A PVC can request specific storage resources, specifying size access modes such as ReadWriteOnce, ReadWriteMany, and ReadOnlyMany.PVCs enable users to consume abstract storage resources, but users typically need PVs with varying properties for different problems. This is why cluster administrators often need to offer varying PVs that differ in more than size and access modes. They can do that without exposing users to implementation details through StorageClass resources.
Ephemeral Volumes
Ephemeral volumes do not store data persistently across restarts. These volumes are bound to the pod's lifetime, which means they are created and deleted along with the pod. It enables stopping and restarting pods without limiting them to the availability of persistent volume.Ephemeral volumes are simple to deploy and manage. You can specify them inline in the pod spec. Ephemeral volumes are ideal for applications that do not require persistent storage, like caching services.
- Ephemeral volumes are simple to deploy and manage. You can specify them inline in the pod spec. Ephemeral volumes are ideal for applications that do not require persistent storage, like caching services.
EmptyDir Volumes
apiVersion: v0
kind: Pod
metadata:
  name: my-pod
spec:
  containers:
  - image: some-image-name
    name: my-container
    volumeMounts:
    - mountPath: /tempfiles
      name: temp-files-volume
  volumes:
  - name: temp-files-volume
    emptyDir: {}
An emptyDir volume is created when Kubernetes assigns a pod to a node. The lifespan of this volume is tied to a pod's lifecycle existing on that specific node. An emptyDir volume recreates when containers restart or crash. However, the data in this volume is deleted and lost when the pod is removed from the node, crashes, or dies.After creating an emptyDir volume, you can declare the volume type name as a field in the pod manifest file. It shows under the volume property section with empty curly braces{} as the value. EmptyDir volumes are suitable mainly for temporary data storage. For example, you can use it for scratch space, like a disk-based merge.You can store emptyDir volumes on the medium backing the node. For example, you can use network storage or SSD. Alternatively, you can set "memory" in the emptyDir.medium field and Kubernetes will mount a RAM-backed filesystem (tmpfs). Note that Kubernetes clears tmpfs on node reboot.
Kubernetes hostPath Volumes
Use a /var/lib/dockerhostPath — to run a container that requires access to Docker internals.
Use a /sys hostPath. — to run cAdvisor in a container.
Allow a pod to specify a hostPath. —to define if a certain hostPath should exist before the pod starts running and if it should be created.
Specify a type for a hostPath volume. — Specify a type for a hostPath volume—you can set this up in addition to the required path property
HostPath volumes security
HostPath volumes pose many security risks. Avoid using these possible whenever possible. If you must use a HostPath volume, you should scope it only to the required directory or file and mount it as ReadOnly.
Kubernetes Volumes ConfigMap
A ConfigMap enables injecting configuration data into pods. Data stored within a ConfigMap can be referenced in a configMap volume type and then consumed by containerized applications that run in a pod. You need to provide the name of the ConfigMap in the volume when referencing a ConfigMap. Kubernetes lets you customize the path for a specific entry in the ConfigMap.
How to create a ConfigMap in YAML? How to mount a ConfigMap as a Volume?
kind: ConfigMap
apiVersion: v1
metadata:
  name: example-configmap
data:
  # Configuration values can be set as key-value properties
  database: mongodb
  database_uri: mongodb://localhost:27017

  # Or set as complete file contents (even JSON!)
  keys: |
    image.public.key=771
    rsa.public.key=42
Create the ConfigMap in your Kubernetes cluster
kubectl apply -f config-map.yaml
Mount the ConfigMap through a Volume
Each property name in this ConfigMap becomes a new file in the mounted directory (/etc/config) after you mount it.
kind: Pod
apiVersion: v1
metadata:
  name: pod-using-configmap

spec:
  # Add the ConfigMap as a volume to the Pod
  volumes:
    # `name` here must match the name
    # specified in the volume mount
    - name: example-configmap-volume
      # Populate the volume with config map data
      configMap:
        # `name` here must match the name
        # specified in the ConfigMap's YAML
        name: example-configmap

  containers:
    - name: container-configmap
      image: nginx:1.7.9
      # Mount the volume that contains the configuration data
      # into your container filesystem
      volumeMounts:
        # `name` here must match the name
        # from the volumes section of this pod
        - name: example-configmap-volume
            mountPath: /etc/config
Attach to the created Pod using kubectl exec -it pod-using-configmap sh. Then run ls /etc/config and you can see each key from the ConfigMap added as a file in the directory. Use cat to look at the contents of each file and you’ll see the values from the ConfigMap.
You can then read the configuration settings using Python/Node.js/PHP from this file.
Storage Classes
The following is a simple example of a StorageClass YAML file. It defines a class of storage called “fast”, that is based on AWS solid state drives (io1) in the Ireland Region (eu-west-1a). It also requests a performance level of 10 IOPs per gigabyte.
kind: StorageClass
apiVersion: storage.k8s.io/v1
metadata:
  name: fast
provisioner: kubernetes.io/aws-ebs
parameters:
  type: io1
  zones: eu-west-1a
  iopsPerGB: "10"
As with all Kubernetes YAML, kind tells the API server what type of object is being defined, and apiVersion tells it which version of the schema to apply to the resource. metadata.name is an arbitrary string value that lets you give the object a friendly name – this example is defining a class called “fast”. provisioner tells Kubernetes which plugin to use, and the parameters field lets you finely tune the type of storage to leverage from the back-end.
A few quick things worth noting:
StorageClass objects are immutable – this means you cannot modify them once deployed. metadata.name should be meaningful as it’s how other objects will refer to the class. The terms provisioner and plugin are used interchangeably. The parameters section is for plugin-specific values, and each plugin is free to support its own set of values. Configuring this section requires knowledge of the storage plugin and associated storage back end.