Dockerizing Golang CLI Tool - A Step-by-Step Guide
I am a Developer experienced in building Web Apps and CLI using Golang. I'm also experienced in Laravel development
Introduction
In the ever-evolving landscape of software development, where rapid deployment and seamless scalability are key, Docker has emerged as a game-changer. Whether you're a seasoned developer or just starting your journey into the world of containers, understanding Docker's core concepts and practical applications can significantly boost your development workflow.
This blog post aims to demystify Docker and guide you through the process of Dockerizing your Golang Command Line Interface (CLI) tool. We'll start from the ground up, covering Docker's fundamental principles, and then seamlessly transition into hands-on implementation. By the end of this guide, you'll not only grasp the essentials of Docker but also have a Dockerized Golang CLI tool ready to conquer your development tasks.
So, whether you're looking to improve the reproducibility of your projects, simplify deployment, or just harness the power of containerization for your Golang applications, you're in the right place. Let's embark on this journey to explore Docker and elevate your development process.
Understanding Docker
In today's fast-paced world of software development, agility and reproducibility are paramount. This is where Docker comes into play. Docker is a powerful platform that simplifies the way you create, deploy, and run applications. In this section, we'll lay the foundation by exploring the fundamentals of Docker.
What is Docker?
Docker is an open-source platform designed to automate the deployment of applications inside lightweight, portable containers. These containers are self-sufficient units that encapsulate everything an application needs to run, including code, runtime, libraries, and system tools. Think of Docker containers as standardized, consistent environments that can run seamlessly on any system that supports Docker.
Key Advantages of Docker:
Isolation: Containers provide process and file system isolation, allowing applications to run independently without interfering with each other.
Portability: Docker containers are highly portable, making it easy to move applications across different environments, from development to production.
Resource Efficiency: Containers share the host operating system's kernel, which results in minimal overhead and faster startup times compared to traditional virtual machines.
Version Control: Docker allows you to version your containers and images, ensuring that your application behaves consistently across different stages of development and deployment.
Docker Components
To better understand Docker, it's essential to be familiar with some of its components:
Image :
Definition: An image is a lightweight, standalone, and executable package that includes everything needed to run a piece of software, including the code, runtime, libraries, and dependencies.
Usage: Images serve as the blueprint for containers. When you run a container from an image, you're essentially starting an instance of that image.
Container :
Definition: A container is a runnable instance of an image. It encapsulates the application and all its dependencies while providing isolation from the host system and other containers.
Usage: Containers are where your applications execute. They are ephemeral, which means they can be created, started, stopped, and destroyed without affecting other containers or the host system.
Registry :
Definition: A registry is a centralized repository for storing Docker images. The most well-known registry is Docker Hub, which hosts a vast collection of publicly available images.
Usage: You can pull (download) and push (upload) Docker images to and from registries. This sharing of images enables collaboration and distribution of applications.
Docker v/s Virtual Machines
Docker containers are often compared to virtual machines (VMs) because they both provide isolation. However, there are significant differences between the two:
Docker Containers :
Lightweight: Containers share the host OS kernel, making them smaller in size and more resource-efficient.
Faster Startup: Containers start quickly, often in seconds.
Resource Sharing: Containers are efficient at sharing resources with the host and other containers.
Virtual Machines :
Heavier: VMs include a full OS, making them larger in size and resource-intensive.
Slower Startup: VMs take longer to start, typically in minutes.
Resource Overhead: VMs have more significant resource overhead due to running a full OS.
In summary, Docker containers offer a lightweight, efficient, and consistent way to package and run applications, making them an ideal choice for modern software development and deployment.
Getting Started
Installing Docker Desktop
Now, you need to install the latest version of Docker Desktop. (You can download it here, do follow the steps given in it to start the Docker Desktop).
Building the CLI tool
After installing the Docker Desktop, you need to have Golang and Cobra cli installed before building the CLI.
For installing Cobra-CLI you can go to Cobra or run
go installgithub.com/spf13/cobra-cli@latestin the terminal.After completing the Installation part to get started make a folder for eg.
go-docker-cli, run the given command
go mod init github.com/Siddheshk02/go-docker-cli
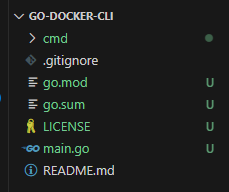
(In place of Siddheshk02 use the name in which your project directories are. Now the structure will look like this)
Cobra-cli init
This command initializes the CLI and creates a main.go file along with cmd folder containing root.go
Now, we are going to build a simple Calculator CLI.
Let's add the commands for Addition, Subtraction, Multiplication and Division.
To add a new command run the following code,
Cobra-cli add add //adds an "add" command for addition
Cobra-cli add subtract //for subtraction
Cobra-cli add multiply //for multiplication
Cobra-cli add divide //for division
Now, let's define flags for the two integer values we need to take for the arithmetic operations.
package cmd

import (
    "fmt"

    "github.com/spf13/cobra"
)

var (
    num1, num2 int
)

// addCmd represents the add command
var addCmd = &cobra.Command{
    Use:   "add",
    Short: "Addition of two integers",
    Run: func(cmd *cobra.Command, args []string) {
        result := num1 + num2
        fmt.Printf("Result of %d + %d = %d\n", num1, num2, result)
    },
}

func init() {
    rootCmd.AddCommand(addCmd)

    addCmd.Flags().IntVar(&num1, "num1", 0, "First integer")
    addCmd.Flags().IntVar(&num2, "num2", 0, "Second integer")
}
This is how the add.go file will look after updating. Similarly, update the subtract.go , multiply.go and divide.go .
subtract.go :
var subtractCmd = &cobra.Command{
    Use:   "subtract",
    Short: "Subtraction of two integers",
    Run: func(cmd *cobra.Command, args []string) {
        result := num1 - num2
        fmt.Printf("Result of %d - %d = %d\n", num1, num2, result)
    },
}

func init() {
    rootCmd.AddCommand(subtractCmd)

    subtractCmd.Flags().IntVar(&num1, "num1", 0, "First integer")
    subtractCmd.Flags().IntVar(&num2, "num2", 0, "Second integer")
}
multiply.go :
var multiplyCmd = &cobra.Command{
    Use:   "multiply",
    Short: "Multiplication of two integers",
    Run: func(cmd *cobra.Command, args []string) {
        result := num1 * num2
        fmt.Printf("Result of %d * %d = %d\n", num1, num2, result)
    },
}

func init() {
    rootCmd.AddCommand(multiplyCmd)

    multiplyCmd.Flags().IntVar(&num1, "num1", 0, "First integer")
    multiplyCmd.Flags().IntVar(&num2, "num2", 0, "Second integer")
}
divide.go :
var divideCmd = &cobra.Command{
    Use:   "divide",
    Short: "Division of two integers",
    Run: func(cmd *cobra.Command, args []string) {
        result := num1 / num2
        fmt.Printf("Result of %d / %d = %d\n", num1, num2, result)
    },
}

func init() {
    rootCmd.AddCommand(divideCmd)

    divideCmd.Flags().IntVar(&num1, "num1", 0, "First integer")
    divideCmd.Flags().IntVar(&num2, "num2", 0, "Second integer")
}
Let's update the description for our CLI in the root.go , (update the rootCmd variable)
var rootCmd = &cobra.Command{
    Use:   "go-docker-cli",
    Short: "A Calculator CLI tool",
}
Now, Build and Run the CLI. Run the command go build . . This command compiles Go source code files in the current directory into an executable binary with the same name as the directory, allowing you to run the resulting program.
Run the CLI using the command ./go-docker-cli , This will give the output as shown below.
A Calculator CLI tool.

Usage:
  go-docker-cli [command]

Available Commands:
  add         Addition of two integers
  completion  Generate the autocompletion script for the specified shell
  divide      Division of two integers
  help        Help about any command
  multiply    Multiplication of two integers
  subtract    Subtraction of two integers

Flags:
  -h, --help     help for go-docker-cli
  -t, --toggle   Help message for toggle

Use "go-docker-cli [command] --help" for more information about a command.
Try running the other commands, ./go-docker-cli add --num1 3 --num2 4 this will give the output as Result of 3 + 4 = 7 . You can try other commands.
So, it's running and giving the results as expected :)
Now, let's delve into the steps for dockerizing our CLI app.
Dockerizing the CLI tool
Dockerization involves packaging your application and its dependencies into a Docker container, ensuring consistent and reproducible execution across different environments.
Creating the Dockerfile
The first step in Dockerizing your Golang CLI tool is to create a Dockerfile. This file contains instructions for building a Docker image that encapsulates your application. Let's create a basic Dockerfile for our CLI calculator:
 # Use an official Golang runtime as a parent image
 FROM golang:alpine

 # Set the working directory inside the container
 WORKDIR /app

 # Copy the local package files to the container's workspace
 COPY . /app

 # Build the Go application inside the container
 RUN go build -o go-docker-cli

 # Define the command to run your application
 ENTRYPOINT ["./go-docker-cli"]
Explanation:
FROM golang:alpine: This states that Docker should start building your Docker image using the official Golang image that is based on Alpine Linux, a lightweight Linux distribution. This Golang image provides the base environment for building and running Go applications.WORKDIR /app: Here, we set the working directory inside the container to/app. This means that any subsequent commands in the Dockerfile will be executed in the context of the/appdirectory within the container. It's like changing to a specific folder when you're working on a computer.COPY . /app: This line copies the contents of your local directory (the directory where you have your Dockerfile and Golang code) into the/appdirectory inside the Docker container. It effectively transfers all your application files and code into the container's workspace.RUN go build -o go-docker-cli: Here, we instruct Docker to run a command inside the container. Specifically, it tells Docker to execute thego buildcommand, which compiles your Golang code into an executable binary. The-o go-docker-clipart specifies that the output binary should be named "go-docker-cli."ENTRYPOINT ["./go-docker-cli"]: This line defines the entry point for your Docker container. When you run a container from this image, it will execute the specified command. In this case, it tells the container to run the "go-docker-cli" binary, which is the Golang application you compiled earlier.Building the Docker Image
Now, let's build the Docker Image. Run the following command,
docker build -t siddheshk02/go-docker-cli:latest .Here,
siddheshk02is the username (use your username from the Docker Hub)This command builds a Docker image from your Golang CLI tool's source code and Dockerfile. The
-tflag tags your image with a name and version (in this case, "siddheshk02/go-docker-cli:latest"). The.at the end specifies that the Dockerfile is in the current directory. This step creates a container image ready for distribution.Now, we'll push this Image to the Docker Hub. (Docker Hub is a central registry for Docker containers, enabling users to store, share, and distribute container images, making it an essential resource for containerization and application deployment.) Run the following command :
docker push siddheshk02/go-docker-cli:latestAfter successfully building your Docker image, you can use this command to upload it to Docker Hub, a public registry for Docker images. By doing so, you make your Dockerized Golang CLI tool publicly accessible for anyone to download and use.
For pulling the Image from the Docker Hub the command is :
docker pull siddheshk02/go-docker-cli:latestRunning the Docker Container
Now to run the Image you've built, use the following command :
docker run go-docker-cli add --num1 2 --num2 4The specified subcommand "add" and accompanying flags "--num1" and "--num2" are passed to your Golang CLI tool inside the container. This step demonstrates how to execute your CLI tool within a containerized environment.
Similarly to Subtract, Multiply and Divide you just need to use
subtract,multiplyanddivideis instead ofaddalong with the "--num1" and "--num2".
Conclusion

In conclusion, this blog has walked you through the fundamentals of Docker and how to Dockerize your Golang CLI tool, facilitating consistent deployment across diverse environments. By following the steps outlined here, you've learned to build, share, and run your containerized application, empowering you to harness the power of Docker for seamless software distribution and execution.
The complete code for this tutorial is updated on GitHub.
To get more information about Golang concepts and to stay updated on the Tutorials follow Siddhesh on Twitter and GitHub.
Until then Keep Learning, Keep Building 🚀🚀